VFR descents accurate and timely descent planning matters … descending isn’t just about getting lower in a haphazard manner. It’s about controlling the descent to ensure you arrive at the correct altitude at the right time and place. Poor descent planning leads to rushed approaches, excessive speed, and missed clearances.
Planning a gradual, stable descent prevents the destabilized, steep approaches that often result from “I’ll start down when I see the airport.”
Using an recognized and established method will help you plan your descents with accuracy, efficiency and safety, With a small amount of math, (and practice) you will be able to consistently predict the point you need to being your descent to the destination airport.
Using the 3 to 1 rule ensures:
- Smoother transitions from cruise to approach
- Better fuel efficiency
- Safer terrain clearance
- Less workload during critical flight phases
- Whether you’re flying a Piper Warrior or a jet, this rule can guide you.
Reasons Pilots use the 3 to 1 Rule
- It works in any aircraft
Whether piston or turbine, the rule applies. - No tech needed
Perfect for VFR or if your autopilot isn’t calculating descent paths. - It builds time awareness
You know when to reduce throttle, descend gently, and manage airspeed. - Reduces ATC corrections
Well-planned descents avoid last-minute changes from controllers.
Distance to descend
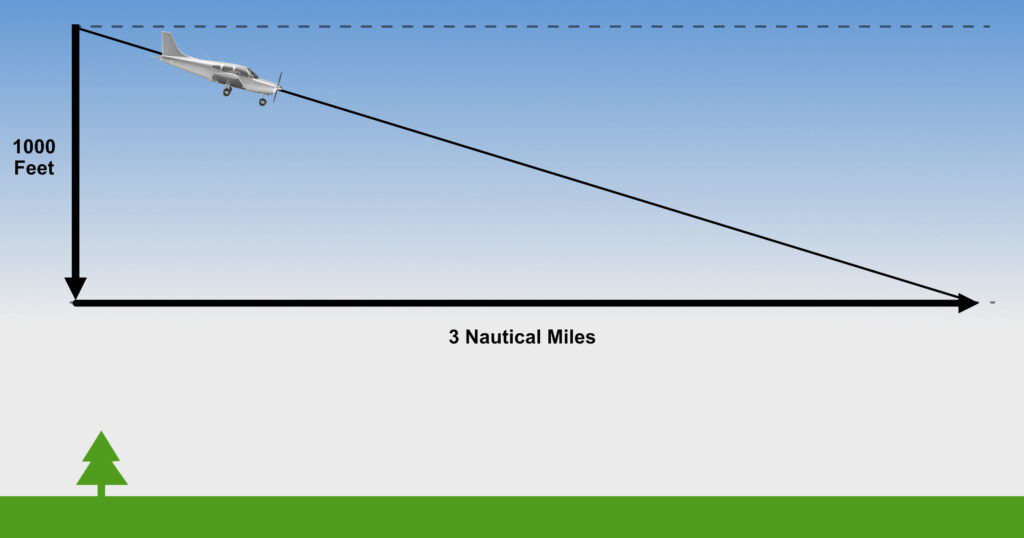
The 3 to 1 rule states that you should descent 1000′ for every 3 nautical miles flown over the ground. The rule is easy to use, you don’t need a calculator or a flight management system. Just a little multiplication, and you’ve got a descent strategy that works in most general aviation and commercial flying situations.
How to Calculate Distance to Start Descent
- Find altitude to lose:
– Subtract your target altitude from your current altitude, divide by 1,000
- Multiply that number by 3.
Example:
You are on a cross country flight at 5,500′ MSL and want to begin you descent down to traffic pattern altitude of an airport 1,000′ MSL .
When should you begin your descent?5,500′ – 1,000′ = 4,500’
4,500 / 1000 = 4.5
4.5 x 3 = 13.5Planning backwards from the airport. you can begin your descent at ~13.5 NM from the airport.
Example:
You are in the northwest practice area and want to fly back to the airport arriving at traffic pattern altitude (TPA).
Your current altitude is 2,500MSL, the traffic pattern altitude is 1,200′ MSL
When should you begin your descent?2,500′ – 1,200 = 1,300’
1,300 / 1000 = 1.3
1.3 x 3 = 3.9Planning backwards from the airport. you can begin your descent at ~4 NM from the airport (in the case of Hanscom Airport – as you enter class D airspace!!)
Adding a few extra miles will allow for a more gradual descent (especially with passengers) will allow you to descend into position with less stress and more time for traffic spotting.
Rate of Descent
While the 3 to 1 rule helps with distance, adding your ground speed into the mix refines your vertical speed (V/S) target.
Once you have the top of descent (TOD) distance to begin your descent you must then calculate the rate of descent (in feet per min)
How to Calculate Rate of Descent
Use the formula – ground speed × 5 = feet per minute (FPM) descent rate
Therefore
- If your groundspeed is 80 KTS – 90 x 5 = 400 feet per min descent rate.
- If your groundspeed is 90 KTS – 90 x 5 = 450 feet per min descent rate.
- If your groundspeed is 100 KTS – 100 x 5 = 500 feet per min descent rate.
- etc
Example:
You are heading back to Hanscom Airport from the southwest practice area over Wachussett Resevoir and want to fly back to the airport arriving at traffic pattern altitude (TPA).
Your current altitude is 4,500MSL,
Your ground speed is 105 KTS
The traffic pattern altitude is 1,200′ MSLWhen should you begin your descent?
4,500′ – 1,200 = 3,300’
3,300 / 1000 = 3.3
3.3 x 3 = 9.9 (~10 miles)What rate of descent should you use?
105 x 5 = 525 (525 feet per minute)
Planning backwards from the airport. you can begin your descent at ~10 NM from the airport and have a descent rate of around 525 feet per minute
Rules of Thumb / Adjustments to Keep in Mind
- Tailwinds: Add extra distance because a tailwind pushes you forward faster.
- Headwinds: Your ground speed will be slower – adjust the rate of descent accordingly – Start your descent slightly earlier.
- Deceleration: Add about 1 NM of distance for every 10 knots of airspeed you need to bleed off if you are slowing down while descending.
Common Mistakes Using the 3 to 1 Rule
- Forgetting to account for winds (A strong headwind means slower ground speed. Begin descent earlier to avoid steep angles.)
- Ignoring altitude crossing restrictions.
- If ATC gives a “be at 3,000 feet 10 miles before the airport,” plug that into your plan early.
- Not reducing power properly
- Start reducing throttle before initiating descent to keep airspeed controlled.
At first, students may need a kneeboard note or app. Over time, mental math becomes second nature.
FAQ
- Is the 3 to 1 rule required by regulations?
No, but it’s a widely accepted guideline used by pilots and CFIs across aviation types. - Can I use it during instrument flight?
Yes. It’s very helpful for planning descents to fixes or approach altitudes. - How do I adjust it for faster aircraft?
Use the same base formula but calculate your vertical speed based on current ground speed. - What happens if I descend too early?
You might fly lower than needed, which can affect fuel efficiency and terrain clearance. Plan it right. - Can I use this rule on VFR flights?
Yes!. It’s just as useful when flying visually to plan smoother approaches. - How do student pilots practice this?
Instructors introduce it during nav training. It becomes essential knowledge before check ride prep.