Normal approach and landing procedures are used when:
- Engine power is available,
- The wind is light or the final approach is made directly into the wind,
- The final approach path has no obstacles,
- The landing surface is firm and of ample length to gradually bring the airplane to a stop.
The selected landing point is normally beyond the runway approach threshold but within the first 1/3 of the runway.
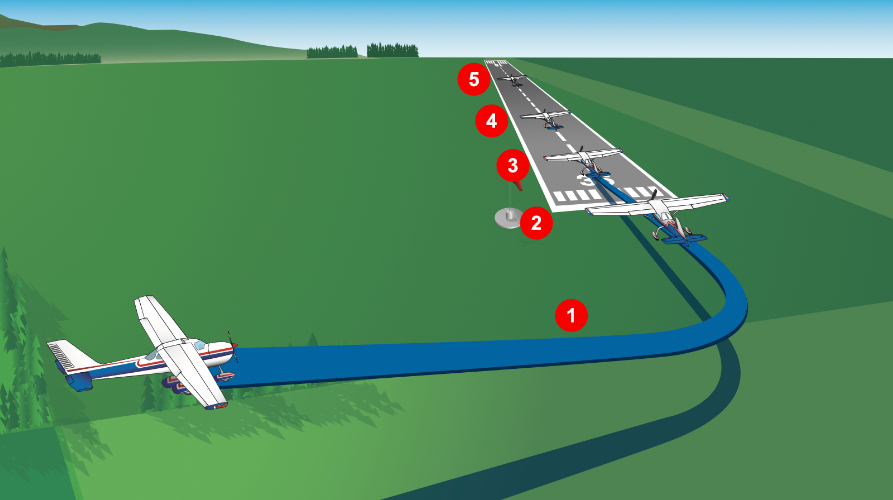
To better understand the factors that influence judgment and procedures, the last part of the approach pattern and the actual landing are divided into 5 phases:
- The base leg
- The final approach
- The round out (commonly known as flare)
- The touchdown
- The after-landing roll
1. BASE LEG
The base leg is important in order to set up for a good landing. Good judgement should be used to determine the height, distance from the approach end of the runway, and rate of descent to allow a stabilized approach, to the runway landing area.
After turning onto the base leg, the pilot starts or continues the descent with reduced power and a target airspeed of approximately 1.4 Vso – the stalling speed in the landing configuration.
For example, if Vso is 60 knots, 1.4 Vso is 84 knots (84 = 1.4 x 60).
Landing flaps should be deployed as recommended Full flaps are not recommended until the final approach is established.
2. Turn to Final / Final
Initiate your base-to-final turn to line up with the runway center line (imagine it is extended outwards towards you). Once the turn to final is completed, align the longitudinal axis of the airplane with the centerline of the runway or landing surface.
Once the airplane is aligned with the runway centerline, the final flap setting is completed and the pitch attitude is adjusted as required.
Some adjustment of pitch and power may be necessary to maintain the desired rate of descent and approach airspeed. The pilot should use the manufacturer’s recommended airspeed or 1.3 Vso if there is no manufacturer’s recommendation.
As the pitch attitude and airspeed stabilize, the airplane is re-trimmed to relieve any control pressure.
The descent angle is controlled throughout the approach so that the airplane lands in the center of the first third of the runway. The descent angle is affected by all four fundamental forces that act on an airplane (lift, drag, thrust, and weight). If all the forces are balanced out such that the net force on the airplane is zero, the descent angle remains constant in a steady state wind condition.
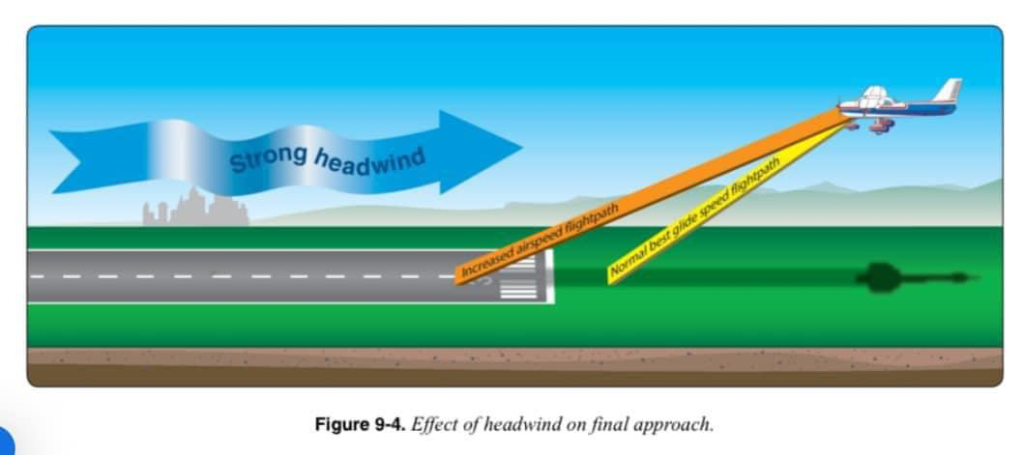
The pilot controls these forces by adjusting the airspeed, attitude, power, and drag (flaps or forward slip). The wind may affect the gliding distance over the ground the pilot does not have control over the wind, but corrects for its effect on the airplane’s descent by adjusting pitch and power appropriately.
A well-executed final approach includes reaching the desired touchdown point at an airspeed that results in minimum floating just before touchdown. To accomplish this, both the descent angle and the airspeed need to be controlled. This is one reason for performing approaches with partial power; if the approach is too high, the pilot can lower the nose and reduce the power to maintain the correct airspeed. When the approach is too low, the pilot can add power and raise the nose.
While the proper angle of descent and airspeed are maintained by integrating pitch and power changes, an untrained or inexperienced pilot may try to reach a landing spot by applying back-elevator pressure without adding power. However, attempting to stretch the final approach by raising the pitch attitude alone is almost always a bad idea. Using pitch alone causes a significant increase in AOA (angle of attack) and decay in airspeed that leads to an excessive rate of descent or a low altitude stall. It is possible for either or both to occur.
3. Level Off (Round Out / Flare)
The level off (or round out) is a slow, smooth transition from a normal approach attitude to a landing attitude, gradually leveling off from the descending flightpath to one that is parallel with, and within a very few inches above, the runway.
When the airplane, in a normal descent, approaches within what appears to be 10 to 20 feet above the ground, the round out or flare is started.
As the airplane reaches a height above the ground where a change into the proper landing attitude can be made, back- elevator pressure is gradually applied to slowly increase the pitch attitude and angle of attack (AOA).

This causes the airplane’s nose to gradually rise toward the desired landing attitude. The AOA is increased at a rate that allows the airplane to continue settling slowly as forward speed decreases.
When the AOA is increased, the lift is momentarily increased and this decreases the rate of descent. Since power normally is reduced to idle during the round out, the airspeed also gradually decreases. This causes lift to decrease again and necessitates raising the nose and further increasing the AOA.
During the round out, the airspeed is decreased to touchdown speed while the lift is controlled so the airplane settles gently onto the landing surface. The round out is executed at a rate that the proper landing attitude and the proper touchdown airspeed are attained simultaneously just as the wheels contact the landing surface.
The rate at which the round out is executed depends on the airplane’s height above the ground, the rate of descent, and the pitch attitude. A round out started excessively high must be executed more slowly than one from a lower height to allow the airplane to descend to the ground while the proper landing attitude is being established. The rate of rounding out must also be proportionate to the rate of closure with the ground. When the airplane appears to be descending very slowly, the increase in pitch attitude must be made at a correspondingly slow rate.
Visual cues are important in flaring at the proper altitude and maintaining the wheels a few inches above the runway until eventual touchdown. Focus direct central vision at a shallow downward angle from 10° to 15° toward the runway as the round out/flare is initiated.
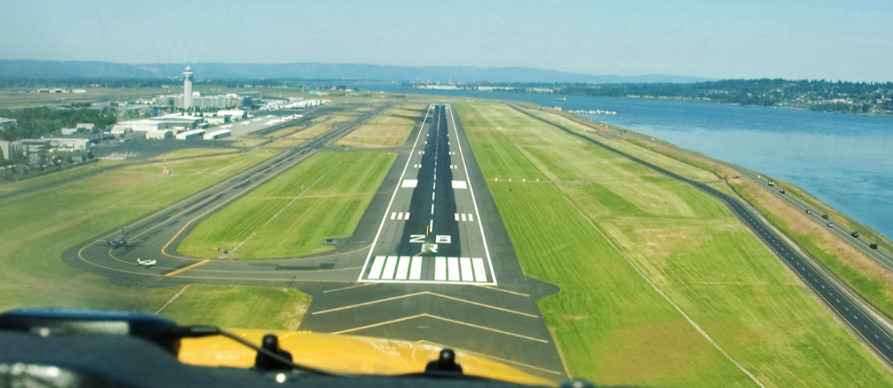
Wrong Surface Landing Avoidance
A wrong surface landing occurs when an aircraft lands or tries to land on the wrong runway, on a taxiway in error, or at the wrong airport.
The pilot should take a moment on every final approach to verify the correctness of the landing zone ahead. Lack of familiarity with a particular airport, complacency, or fatigue may lead to pilot confusion, and occasionally a pilot will line up with the wrong surface while perceiving the situation as normal. A pilot may compensate for any lack of destination airport familiarity by studying an airport diagram and lighting ahead of time and noting key features and geometry.
On final approach, the pilot should verify correct runway alignment and runway number. Pilots often refer to moving map displays driven by GPS, and these devices should increase situational awareness and safety (but one shall not take those cues for granted and not execute prior homework). If there is a doubt over the landing surface, the pilot should go around and consider the situation further (as well as communicate with ATC for clarity if at a controlled airfield).
Stabilized Approach Concept
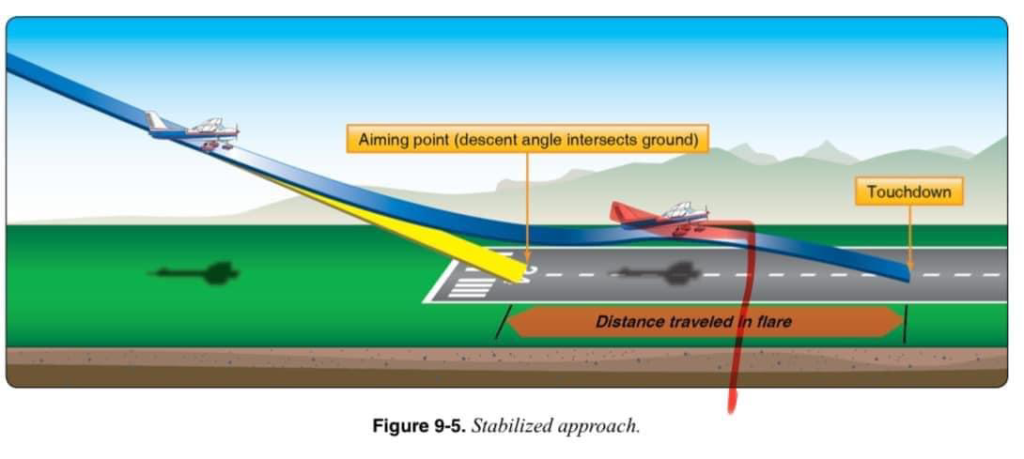
A stabilized approach is one in which the pilot establishes and maintains a constant-angle glide path towards a predetermined point on the landing runway. It is based on the pilot’s judgment of certain visual clues and depends on maintaining a constant final descent airspeed and configuration.
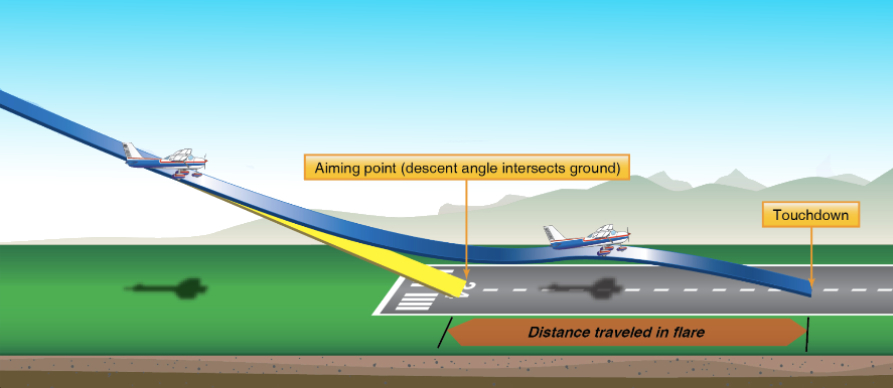
An airplane descending on final approach at a constant rate and airspeed travels in a straight line towards a spot on the ground ahead, commonly called the aiming point. If the airplane maintains a constant glide path without a round out for landing, it will strike the ground at the aiming point.
To the pilot, the aiming point appears to be stationary. It does not appear to move under the nose of the aircraft and does not appear to move forward away from the aircraft. This feature identifies the aiming point — it does not move.
However, objects in front of and beyond the aiming point do appear to move as the distance is closed, and they appear to move in opposite directions! For a constant angle glide path, the distance between the horizon and the aiming point remains constant. If descending at a constant angle and the distance between the perceived aiming point and the horizon appears to increase (aiming point moving down away from the horizon), then the true aiming point is farther down the runway. If the distance between the perceived aiming point and the horizon decreases, meaning that the aiming point is moving up toward the horizon, the true aiming point is closer than perceived.
During instruction in landings, one of the important skills a pilot acquires is how to use visual cues to discern the true aiming point from any distance out on final approach. From this, the pilot determines if the current glide path will result in either an under or overshoot.
Note that the aiming point is not where the airplane actually touches down. Since the pilot reduces the rate of descent during the round out (flare), the actual touchdown occurs farther down the runway. Considering float during round out, the pilot is also able to predict the point of touchdown with some accuracy.
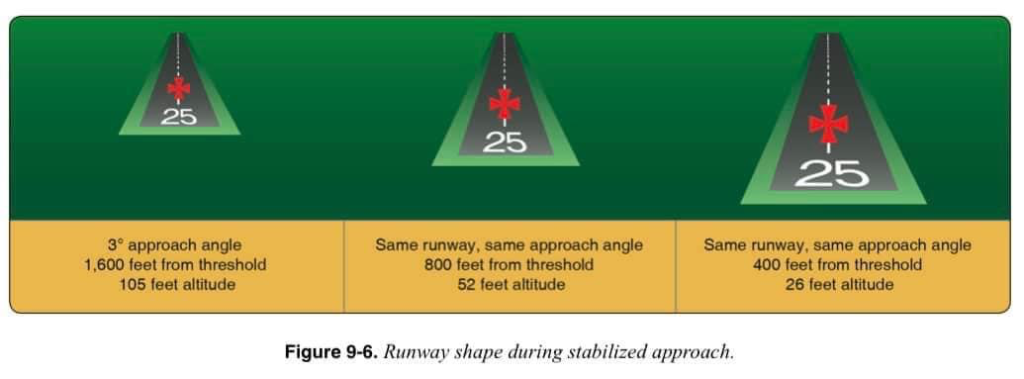
When the airplane is established on final approach, the shape of the runway image also presents clues as to what should be done to maintain a stabilized approach to a safe landing.
Obviously, a runway is normally shaped in the form of an elongated rectangle. When viewed from the air during the approach, the phenomenon, known as perspective, causes the runway to assume the shape of a trapezoid with the far end looking narrower than the approach end and the edge lines converging ahead.
As an airplane continues down the glide path at a constant angle (stabilized), the image the pilot sees is still trapezoidal, but of proportionately larger dimensions. In other words, during a stabilized approach, the runway shape does not change.
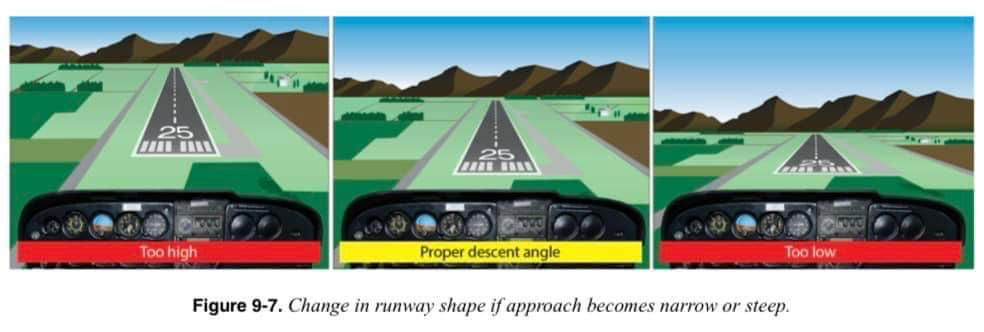
If the approach becomes shallow, the runway appears to shorten and become wider. Conversely, if the approach is steepened, the runway appears to become longer and narrower.
Immediately after rolling out on final approach, the pilot adjusts the pitch attitude, power, and trim so that the airplane is descending directly toward the aiming point at the appropriate airspeed in the landing configuration. If it appears that the airplane is going to overshoot the desired landing spot, a steeper approach results by reducing power and lowering the pitch attitude to maintain airspeed.
If available and not fully extended, the pilot may further extend the flaps. If the desired landing spot is being undershot and a shallower approach is needed, the pilot increases both power and pitch attitude to reduce the descent angle. Once the approach is set up and control pressures removed with trim, the pilot is free to devote significant attention toward outside references and use the available visual cues to fine tune the approach. The pilot should not stare at any one place, but rather scan from one point to another, such as from the aiming point to the horizon, to any objects along the runway, to an area well short of the runway, and back to the aiming point. This makes it easier to perceive any deviation from the desired glide path and determine if the airplane is proceeding directly toward the aiming point.
The pilot should also glance at the airspeed indicator periodically and correct for any airspeed deviation.
Pilots normally establish a stabilized approach before short final. The round out, touchdown, and landing roll are much easier to accomplish when preceded by a stabilized final approach, which reduces the chance of a landing mishap. Therefore, deviations from the desired glide path should be detected and corrected early so that the magnitude of corrections during the later portion of the approach is small. If the approach is very high or very low, it may not be possible to establish a stabilized approach, and the pilot normally executes a go-around. If the airplane is initially low and undershooting the aiming point, the pilot may intercept the desired glide path by increasing pitch attitude and adding power to level off while maintaining the correct airspeed. This may necessitate a substantial increase in power if the aircraft is operating on the backside of the power curve. As the airplane intercepts the desired glide path, the pilot reduces power and pitches down to remain on the glide path. Retracting the flaps to correct for an undershoot creates an unnecessary risk. It may cause a sudden decrease in lift, an excessive sink rate, and an aggravated unstable condition.
If the approach is too high or too low, it may not be possible to establish a stabilized approach, and the pilot should execute a go-around. Typically, pilots go-around if unable to establish a stabilized approach by 500 ft above airport elevation in visual meteorological conditions (VMC) or 1,000 ft above airport elevation in instrument conditions (IMC).
For a typical GA piston aircraft in a traffic pattern, an immediate go-around should be initiated if the approach becomes unstabilized below 300 ft AGL.
Pilots may consider the following elements when attempting to set up and fly a stabilized approach to landing. The pilot should focus on the elements that lead to a stabilized approach rather than the order of the elements or the insistence on meeting all of the approach criteria. For a typical piston aircraft, an approach is stabilized when the following criteria are met:
Stabilized Approach Considerations
- Glide path. Typically a constant 3 degrees to the touchdown zone on the runway (obstructions permitting).
- Heading. The aircraft tracks the centerline to the runway with only minor heading/pitch changes necessary to correct for wind or turbulence to maintain alignment. Bank angle normally limited to 15 degrees once established on final.
- Airspeed. The aircraft speed is within +10 /-5 KIAS of the recommended landing speed specified in the AFM, 1.3Vso, or on approved placards/markings. If the pilot applies a gust factor, indicated airspeed should not decay below the recommended landing speed.
- Configuration. The aircraft is in the correct landing configuration with flaps as required; landing gear extended, and is in trim.
- Descent rate. A descent rate (generally 500-1000 fpm for light general aviation aircraft) makes for a safe approach. Minimal adjustments to the descent rate as the airplane approaches the runway provide an additional indication of a stabilized and safe approach. If using a descent rate in excess of 500 fpm due to approach considerations, the pilot should reduce the descent rate prior to 300 ft AGL.
- Power setting. The pilot should use a power setting appropriate for the aircraft configuration and not below the minimum power for approach as defined by the AFM.
- Briefings and checklists. Completing all briefings and checklists prior to initiating the approach (except the landing checklist), ensures the pilot can focus on the elements listed above.
ESTIMATING AIRPLANE MOVEMENT AND HEIGHT
During short final, round out, and touchdown, vision is of prime importance. To provide a wide scope of vision and to foster good judgment of height and movement, the pilot’s head should assume a natural, straight-ahead position. Visual focus is not fixed on any one side or any one spot ahead of the airplane. Instead, it is changed slowly from a point just over the airplane’s nose to the desired touchdown zone and back again. This is done while maintaining a deliberate awareness of distance from either side of the runway using peripheral vision.
Accurate estimation of distance, besides being a matter of practice, depends upon how clearly objects are seen. It requires that vision be focused properly so that the important objects stand out as clearly as possible.
Speed blurs objects at close range. For example, most everyone has noted this in an automobile moving at high speed. Nearby objects seem to merge together in a blur, while objects farther away stand out clearly. The driver subconsciously focuses the eyes sufficiently far ahead of the automobile to see objects distinctly.
The distance at which the pilot’s vision is focused should be proportional to the speed at which the airplane is traveling over the ground.
Thus, as speed is reduced during the round out, the distance ahead of the airplane at which it is possible to focus is brought closer accordingly.
If the pilot attempts to focus on a reference that is too close or looks directly down, the reference becomes blurred, [Figure 9-8] and the reaction is either too abrupt or too late. In this case, the pilot’s tendency is to over-control, round out high, and make full-stall, drop-in landings. If the pilot focuses too far ahead, accuracy in judging the closeness of the ground is lost and the consequent reaction is too slow, since there does not appear to be a necessity for action. This sometimes results in the airplane flying into the ground nose first. The change of visual focus from a long distance to a short distance requires a definite time interval, and even though the time is brief, the airplane’s speed during this interval is such that the airplane travels an appreciable distance, both forward and downward toward the ground.
Visual cues are important in flaring at the proper height and maintaining the wheels a few inches above the runway until eventual touchdown. Flare cues are primarily dependent on the angle at which the pilot’s central vision intersects the ground (or runway) ahead and slightly to the side. Proper depth perception is a factor in a successful flare, but the visual cues used most are those related to changes in runway or terrain perspective and to changes in the size and texture of familiar objects near the landing area. The pilot should focus direct central vision at a shallow downward angle from 10° to 15° relative to the runway as the round out/flare is initiated. [Figure 9-9] When using this steady viewing angle, the point of visual interception with the runway appears progressively closer as the airplane loses altitude. This rate of closure is an important visual cue in assessing the rate of altitude loss. Conversely, movement of the visual interception point further down the runway indicates an increase in altitude and means that the pitch angle was increased too rapidly during the flare. Location of the visual interception point in conjunction with assessment of flow velocity of nearby off-runway terrain, as well as the similarity of appearance of height above the runway ahead of the airplane (in comparison to the way it looked when the airplane was taxied prior to takeoff), is also used to judge when the wheels are just a few inches above the runway.
ROUND OUT (FLARE)
The round out is a slow, smooth transition from a normal approach attitude to a landing attitude, gradually rounding out the flightpath to one that is parallel to and a few inches above the runway. When the airplane approaches 10 to 20 feet above the ground in a normal descent, the round out or flare is started. Back-elevator pressure is gradually applied to slowly increase the pitch attitude and AOA.
[Figure 9-10] The AOA is increased at a rate that allows the airplane to continue settling slowly as forward speed decreases. This is a continuous process until the airplane touches down on the ground.
When the AOA is increased, the lift is momentarily increased and this decreases the rate of descent. Since power normally is reduced to idle during the round out, the airspeed also gradually decreases. This causes lift to decrease again and necessitates raising the nose and further increasing the AOA. During the round out, the airspeed is decreased to touchdown speed while the lift is controlled so the airplane settles gently onto the landing surface. The round out is executed at a rate such that the proper landing attitude and the proper touchdown airspeed are attained simultaneously just as the wheels contact the landing surface.
The rate at which the round out is executed depends on the airplane’s height above the ground, the rate of descent, and the pitch attitude.
A round out started excessively high needs to be executed more slowly than one started from a lower height. The round out rate should also be proportional to the rate of closure with the ground. When the airplane appears to be descending very slowly, the increase in pitch attitude should be made at a correspondingly slow rate.
The pitch attitude of the airplane in a full-flap approach is considerably lower than in a no-flap approach. To attain the proper landing attitude before touching down, the nose needs to travel through a greater pitch change when flaps are fully extended. Since the round out is usually started at approximately the same height above the ground regardless of the degree of flaps used, the pitch attitude should be increased at a faster rate when full flaps are used. However, the round out should still be executed at a rate that takes the airplane’s downward motion into account.
Once the actual process of rounding out is started, the pilot should not push the elevator control forward. If too much back-elevator pressure was exerted, this pressure is either slightly relaxed or held constant, depending on the degree of the error. In some cases, it may be necessary to advance the throttle slightly to prevent an excessive rate of sink or a stall, either of which results in a hard, drop-in type landing.
It is recommended that a pilot form the habit of keeping one hand on the throttle throughout the approach and landing should a sudden and unexpected hazardous situation require an immediate application of power.
TOUCHDOWN
The touchdown is the gentle settling of the airplane onto the landing surface. The round out and touchdown are normally made with the engine idling. During the round out, the airspeed decays such that the airplane touches down on the main gear at or just above the approximate stalling speed. As the airplane settles, proper landing attitude is attained by application of whatever back-elevator pressure is necessary.
Some pilots try to force or fly the airplane onto the ground without establishing proper landing attitude. The airplane should never be flown onto the runway with excessive speed. A common technique to making a smooth touchdown is to actually focus on holding the wheels of the aircraft a few inches off the ground as long as possible using the elevators while the power is smoothly reduced to idle. In most cases, when the wheels are within 2 or 3 feet of the ground, the airplane is still settling too fast for a gentle touchdown. Therefore, this descent is retarded by increasing back-elevator pressure. Since the airplane is already close to its stalling speed and is settling, this added back-elevator pressure only slows the settling instead of stopping it. At the same time, it results in the airplane touching the ground in the proper landing attitude and the main wheels touching down first so that little or no weight is on the nose-wheel. [Figure 9-11]
After the main wheels make initial contact with the ground, back-elevator pressure is held to maintain a positive AOA for aerodynamic braking and to hold the nose-wheel off the ground as the airplane decelerates. The pilot should be certain not to inadvertently have brake pressure engaged as touchdown occurs. Early use of brakes can result in a sudden drop in the nose and a loss of aerodynamic braking. As the airplane’s momentum decreases, back-elevator pressure is gradually relaxed to allow the nose-wheel to gently settle onto the runway.
This permits steering if the airplane has a steerable nose-wheel. At the same time, it decreases the AOA and reduces lift on the wings to prevent floating or skipping and allows the full weight of the airplane to rest on the wheels for better mechanical braking action. As the airplane slows, the mechanical braking becomes more effective.
It is extremely important that the touchdown occur with the airplane’s longitudinal axis exactly parallel to the direction in which the airplane is moving along the runway. Failure to accomplish this imposes severe side loads on the landing gear. To avoid these side stresses, the pilot should not allow the airplane to touch down while turned into the wind or drifting.
AFTER LANDING ROLL
The landing process should never be considered complete until the airplane decelerates to the normal taxi speed during the landing roll or has been brought to a complete stop when clear of the landing area. Accidents may occur as a result of pilots abandoning their vigilance and failing to maintain positive control after getting the airplane on the ground.
A pilot should be alert for directional control difficulties immediately upon and after touchdown due to the ground friction on the wheels.
Loss of directional control may lead to an aggravated, uncontrolled, tight turn on the ground, or a ground loop. The combination of centrifugal force acting on the center of gravity (CG) and ground friction of the main wheels resisting it during the ground loop may cause the airplane to tip or lean enough for the outside wingtip to contact the ground. This imposes a sideward force that could collapse the landing gear.
The rudder serves the same purpose on the ground as it does in the air—it controls the yawing of the airplane. The effectiveness of the rudder is dependent on the airflow, which depends on the speed of the airplane. As the speed decreases and the nose-wheel has been lowered to the ground, the steerable nose provides more positive directional control.
The brakes of an airplane serve the same primary purpose as the brakes of an automobile-
-to reduce speed on the ground. In airplanes,
they are also used as an aid in directional control when more positive control is required than could be obtained with rudder or nose-wheel steering alone.
To use brakes, on an airplane equipped with toe brakes, the pilot slides the toes or feet up from the rudder pedals to the brake pedals. If rudder pressure is being held at the time braking action is needed, the pilot should not release that pressure as the feet or toes are being slid up to the brake pedals because control may be lost before brakes can be applied.
Putting maximum weight on the wheels after touchdown is an important factor in obtaining optimum braking performance. During the early part of rollout, some lift continues to be generated by the wing. After touchdown, the nose-wheel is lowered to the runway to maintain directional control. During deceleration, applying brakes may cause the nose to pitch down and some weight to transfer to the nose-wheel from the main wheels. This does not aid in braking action, so back pressure is applied to the controls without lifting the nose-wheel off the runway. This enables directional control while keeping weight on the main wheels.
Careful application of the brakes is initiated after the nose-wheel is on the ground and directional control is established. Maximum brake effectiveness is just short of the point where skidding occurs. If the brakes are applied so hard that skidding takes place, braking becomes ineffective. Skidding is stopped by releasing the brake pressure. Braking effectiveness is not enhanced by alternately applying, releasing, and reapplying brake pressure. The brakes are applied firmly and smoothly as necessary.
During the ground roll, the airplane’s direction of movement can be changed by carefully applying pressure on one brake or uneven pressures on each brake in the desired direction. Caution must be exercised when applying brakes to avoid over-controlling.
The ailerons serve the same purpose on the ground as they do in the air-they change the lift and drag components of the wings. During the after-landing roll, they are used to keep the wings level in much the same way they are used in flight. If a wing starts to rise, aileron control is applied toward that wing to lower it. The amount required depends on speed because as the forward speed of the airplane decreases, the ailerons become less effective. Procedures for using ailerons in crosswind conditions are explained in the “Crosswind Approach and Landing” section of this chapter.
Once the airplane has slowed sufficiently and has turned onto the taxiway and stopped, the pilot performs the after-landing checklist.
Many accidents have occurred as a result of the pilot unintentionally operating the landing gear control and retracting the gear instead of the flap control when the airplane was still rolling. The habit of positively identifying both of these controls, before actuating them, should be formed from the very beginning of flight training and continued in all future flying activities. If available runway permits, the speed of the airplane is allowed to dissipate in a normal manner.
COMMON ERRORS
Common errors in the performance of normal approaches and landings are:
- Failure to complete the landing checklist in a timely manner.
- Inadequate wind drift correction on the base leg.
- An overshooting, undershooting, too steep, or too shallow a turn onto final approach.
- A skidding turn from base leg to final approach as a result of overshooting/inadequate wind drift correction.
- Poor coordination during turn from base to final approach.
- Unstable approach.
- Failure to adequately compensate for flap extension.
- Poor trim technique on final approach.
- Attempting to maintain altitude or reach the runway using elevator alone.
- Focusing too close to the airplane resulting in a too high round out.
- Focusing too far from the airplane resulting in a too low round out.
- Touching down prior to attaining proper landing attitude.
- Failure to hold sufficient back-elevator pressure after touchdown.
- Excessive braking after touchdown.
- Loss of aircraft control during touchdown and rollout.
GO-AROUNDS (REJECTED LANDINGS)
Go-Arounds (Rejected Landings)
A go-around is a normal maneuver that is used when approach and landing parameters deviate from expectations or when it is hazardous to continue. Situations such as air traffic control (ATC) requirements, unexpected appearance of hazards on the runway, overtaking another airplane, wind shear, wake turbulence, mechanical failure, or an unstable approach are all reasons to discontinue a landing approach. Like any other normal maneuver, the go-around should be practiced and perfected. The flight instructor should emphasize early on, and the pilot should understand, that any approach or landing may result in a go-around. The assumption that an aborted landing is invariably the consequence of a poor approach, which in turn is due to insufficient experience or skill, is a fallacy.
Although the need to discontinue a landing may arise at any point in the landing process, the most critical go-around is one started when very close to the ground. The go-around maneuver is not inherently dangerous in itself. It becomes dangerous only when delayed unduly or executed improperly.
Delay in initiating the go-around normally stems from two sources:
- Landing expectancy or set—the anticipatory belief that conditions are not as threatening as they are and that the approach is sure to terminate with a safe landing.
- Pride-the mistaken belief that the act of going around is an admission of failure; failure to execute the approach properly.
The proper execution of a go-around maneuver includes three cardinal principles:
- Power
- Attitude
- Configuration
POWER
Power is the pilot’s first concern. The instant a pilot decides to go around, full or maximum allowable takeoff power should be applied smoothly, without hesitation, and held until flying speed and controllability are restored. An airplane that is settling toward the ground has inertia that needs to be overcome, and sufficient power is needed to stop the descent. The application of power is smooth, as well as positive. Abrupt movements of the throttle in some airplanes cause the engine to falter. Carburetor heat is turned off to obtain maximum power, as applicable.
ATTITUDE
A pilot executing a go-around needs to accept the fact that an airplane cannot fly below stall speed, and it cannot climb below minimum power required speed. The pilot should resist any impulse to pitch-up for a climb if airspeed is insufficient. In some circumstances, it may be desirable to lower the nose briefly to gain airspeed and not be on the backside of the power curve.
At the time a pilot decides to go around, a trim setting for low airspeed is in place. The sudden addition of power tends to raise the airplane’s nose and causes left yaw. Allowing the nose to rise too early could result in an unrecoverable stall when the go-around occurs at a low altitude. The pilot should anticipate the need for considerable forward elevator pressure to hold the nose level or in a safe climb attitude. The pilot applies sufficient right rudder pressure to counteract torque and P-factor. Trim helps to relieve adverse control pressures and assists in maintaining a proper pitch attitude. After attaining the appropriate airspeed and adjusting pitch attitude for a climb, the pilot should “rough trim” the airplane to relieve any adverse control pressures. More precise trim adjustments can be made when flight conditions have stabilized. On airplanes that produce high control pressures when using maximum power on go-arounds, the pilot should use caution when reaching for the flap handle. Airplane control is the first consideration during this high-workload phase.
CONFIGURATION
After establishing the proper climb attitude and power settings, the pilot’s next concern is flap retraction. After the descent has been stopped, the landing flaps are partially retracted or placed in the takeoff position as recommended by the manufacturer. Depending on the airplane’s altitude and airspeed, it is wise to retract the flaps intermittently in small increments to allow time for the airplane to accelerate progressively as they are being raised. A sudden and complete retraction of the flaps could cause a loss of lift resulting in the airplane settling into the ground. [Figure 9-12]
Unless otherwise specified in the AFM/POH, it is generally recommended that the flaps be retracted (at least partially) before retracting the landing gear for two reasons. First, on most airplanes full flaps produce more drag than the landing gear; and second, in case the airplane inadvertently touches down as the go-around is initiated, it is desirable to have the landing gear in the down-and-locked position.
After a positive rate of climb is established, the landing gear is retracted.
The landing gear is retracted only after the initial or rough trim is accomplished and when it is certain the airplane will remain airborne.
During the initial part of an extremely low go-around, it is possible for the airplane to settle onto the runway and bounce. This situation is not particularly dangerous provided the airplane is kept straight and a constant, safe pitch attitude is maintained. With the application of power, the airplane attains a safe flying speed rapidly and the advanced power cushions any secondary touchdown.
GROUND EFFECT
Ground effect is a factor in every landing and every takeoff in fixed-wing airplanes. Ground effect can also be an important factor in go-arounds. If the go-around is made close to the ground, the airplane may be in the ground effect area. Pilots are often lulled into a sense of false security by the apparent “cushion of air” under the wings that initially assists in the transition from an approach descent to a climb.
This “cushion of air,”
however, is imaginary. The apparent increase in airplane performance is, in fact, due to a reduction in induced
drag in the ground effect area. It is “borrowed” performance that is repaid when the airplane climbs out of the ground effect area. The pilot needs to factor in ground effect when initiating a go-around close to the ground. An attempt to climb prematurely may result in the airplane not being able to climb or even maintain altitude at full power.
COMMON ERRORS
Common errors in the performance of go-arounds (rejected landings) are:
- Failure to recognize a condition that warrants a rejected landing.
- Indecision.
- Delay in initiating a go-around.
- Failure to apply maximum allowable power in a timely manner.
- Abrupt power application.
- Improper pitch attitude.
- Failure to configure the airplane appropriately.
- Attempting to climb out of ground effect prematurely.
- Failure to adequately compensate for torque/P factor.
- Loss of aircraft control.
INTENTIONAL SLIPS
A slip occurs when the bank angle of an airplane is too steep for the existing rate of turn. Unintentional slips are most often the result of uncoordinated rudder/aileron application. Intentional slips, however, are used to dissipate altitude without increasing airspeed and/ or to adjust airplane ground track during a crosswind. Intentional slips are especially useful in forced landings and in situations where obstacles need to be cleared during approaches to confined areas. A slip can also be used as a means of rapidly reducing airspeed in situations where wing flaps are inoperative or not installed.
A slip is a combination of forward movement and sideward (with respect to the longitudinal axis of the airplane) movement, the lateral axis being inclined and the sideward movement being toward the low end of this axis (low wing). An airplane in a slip is in fact flying sideways through the air even though it may appear to be going straight over the ground. This results in a change in the direction that the relative wind strikes the airplane. Slips are characterized by a marked increase in drag and corresponding decrease in airplane climb, cruise, and glide performance. Because the airplane is banked, the vertical component of lift is reduced allowing for an airplane in a slip to descend rapidly without an increase in airspeed.
Most airplanes exhibit the characteristic of positive static directional stability and, therefore, have a natural tendency to compensate for slipping. An intentional slip usually requires deliberate cross-controlling of ailerons and rudder throughout the maneuver.
There are two types of intentional slips: sideslip and forward slips. Sideslips are frequently used when landing with a crosswind to keep the aircraft aligned with the runway centerline. A sideslip is entered by lowering a wing and applying just enough opposite rudder to prevent a turn. In a sideslip, the airplane’s longitudinal axis remains parallel to the original flightpath, but the airplane no longer flies straight ahead. Instead, the horizontal component of lift forces the airplane to also move somewhat sideways toward the low wing [Figure 9-13].
The amount of slip and therefore the rate of sides ard arveme at, is do trove so by the bank angle. The steeper the bank, the greater the degree of slip. As bank angle is increased, additional opposite rudder is required to prevent turning.
A forward slip is used to dissipate altitude and increase descent rate without increasing airspeed. In a forward slip, the airplane’s direction of motion continues the same as before the slip was begun. Assuming the airplane is originally in straight coordinated flight, the wing on one side is lowered by use of the ailerons. Simultaneously, sufficient opposite rudder is used to yaw the airplane’s nose in the opposite direction such that the airplane remains on its original flightpath. However, the nose of the airplane will no longer point in the direction of flightpath. [Figure 9-14] In a forward slip, the amount of slip, and therefore the sink rate, is determined by the bank angle. The steeper the bank, the steeper the descent. In order to use the maneuver to lose altitude, power is normally reduced to idle. The pilot controls airspeed using elevator control. When a crosswind is present, the pilot should lower the upwind wing such that the airplane is banked into the crosswind since slipping into the wind makes it easier to remain on the original flightpath.
In most light airplanes, the steepness of a slip is limited by the amount of rudder travel available. In both sideslips and forward slips, the point may be reached where full rudder is required to maintain heading even though the ailerons are capable of further steepening the bank angle. This is the practical slip limit because any additional bank would cause the airplane to turn even though full opposite rudder is being applied. If there is a need to descend more rapidly, even though the practical slip limit has been reached, lowering the nose not only increases the sink rate but also increases airspeed. The increase in airspeed increases rudder effectiveness permitting a steeper slip.
Conversely, when the nose is raised, rudder effectiveness decreases and the bank angle should be reduced.
Discontinuing a slip is accomplished by leveling the wings and simultaneously releasing the rudder pressure while readjusting the pitch attitude to the normal glide attitude. If the pressure on the rudder is released abruptly, the nose swings too quickly into line and the airplane tends to acquire excess speed. Because of the location of the pitot tube and static vents, airspeed indicators in some airplanes may have considerable error when the airplane is in a slip. The pilot needs to be aware of this possibility and recognize a properly performed slip by the attitude of the airplane, the sound of the airflow, and the feel of the flight controls. Unlike skids, however, if an airplane in a slip is made to stall, it displays very little of the yawing tendency that causes a skidding stall to develop into a spin. The airplane in a slip may do little more than tend to roll into a wings-level attitude.
Note that some airplanes have limitations regarding slips. In some cases slips are limited in duration or by fuel quantity. These limitations are meant to preclude fuel starvation caused when fuel is forced to one side of a tank in uncoordinated flight. If a forward slip is being used to reach a landing area in an actual engine-out emergency, the time limitation or fuel limitation is irrelevant (unless a prolonged slip caused the engine issue). For aerodynamic reasons, there may also be recommendations or limitations related to slips with flaps extended. Consult the manufacturer’s AFM/POH for specific airplane information.
Some pilots try to avoid using forward slips. An approach with flaps allows for coordinated and more familiar flight orientation, while the sideways force on the occupants of the aircraft during a forward slip may seem uncomfortable. However, in a real emergency that involves engine failure, the ability to use a forward slip provides a pilot with a technique contributing to a better outcome. In that situation, a pilot may initiate a descent using a forward slip much more quickly than by deploying flaps. To reduce the descent, the pilot can remove the slip without penalty. On the other hand, retracting flaps on an approach could lead to an unwanted loss of altitude. Even with full rudder displacement during a forward slip, the pilot can adjust to the left and right of the intended ground track by increasing and decreasing aileron deflection. The value of the maneuver explains its inclusion as a task in the Private Pilot Airman Certification Standards (ACS).
FORWARD SLIP TO A LANDING
When demonstrating a forward slip to a landing in an airport traffic pattern, the pilot plans the descent such that a forward slip may be used on final approach. Flaps usually remain retracted, and using a forward slip on downwind or base may be a necessary part of the maneuver. When abeam the landing point on the downwind leg, the pilot initiates a descent by reducing power to idle. If an insufficient rate of descent occurs on downwind, the pilot uses a forward slip to increase the rate of descent. The pilot should make a coordinated turn to base. At this point, ongoing evaluation of height takes place. If the airplane is high on base, continued forward slip should occur.
However, the pilot should make a coordinated turn to line up with the final approach course. Once established on a final approach, the height above ground should be sufficient to allow the pilot to use a forward slip and establish a suitable approach path to the runway aiming point. At the appropriate time, when the round out begins, the pilot removes the forward slip and transitions to a normal landing.
COMMON ERRORS
Common errors with forward slips to a landing:
- Incorrect pitch adjustments that result in poor airspeed control.
- Reacting to erroneous airspeed indications.
- Using excess power while trying to lose altitude.
- A slip in the same direction as any crosswind.
- Poor glidepath control.
- Late transition to a sideslip during landing with crosswinds.
- Landing without the longitudinal axis parallel to runway.
- Landing off the centerline.
CROSSWIND APPROACH AND LANDING
Most runways or landing areas are such that landings need to be made while the wind is blowing at an angle to the runway rather than parallel to the landing direction. All pilots should be prepared to manage a crosswind situation when it arises. Many of the same basic principles and factors involved in a normal approach and landing apply to a crosswind approach and landing; therefore, only the additional procedures required for correcting for wind drift are discussed here.
Crosswind landings are a little more difficult to perform than crosswind takeoffs, mainly due to different inputs involved in maintaining accurate control of the airplane while its speed is decreasing rather than increasing as on takeoff.
There are two usual methods of accomplishing a crosswind approach and landing the crab method and the wing-low (sideslip) method.
Although the crab method may be easier for the pilot to maintain during final approach, it requires judgment and precise timing when removing the crab immediately prior to touchdown. The wing-low method is recommended in most cases, although a combination of both methods may be used. While current testing standards allow for either method, pilots should learn to do both.
CROSSWIND FINAL APPROACH
When using the crab method, the pilot makes a coordinated turn to establish a heading (crab) toward the wind. The selected heading should align the airplane’s wings-level ground track with the centerline of the runway. The pilot makes small heading corrections, if needed, to maintain alignment with the runway. [Figure 9-15] The appropriate crab angle is maintained until just prior to touchdown, when the pilot uses rudder control to align the longitudinal axis of the airplane with the runway to avoid sideward contact of the wheels with the runway. A change in alignment made too early or too late results in a side load. If a long final approach is being flown, one option is to use the crab method initially and smoothly transition to the wing-low method before the round out is started.
While the wing-low (sideslip) method also compensates for a crosswind from any angle, it keeps the airplane’s ground track and longitudinal axis aligned with the runway centerline throughout the final approach, round out, touchdown, and after-landing roll. This prevents the airplane from touching down in a sideward motion and imposing damaging side loads on the landing gear. When first experienced, it may seem odd to land while holding a bank angle. Although some pilots state that it appears the upwind wingtip will strike the ground, this is not the case. This method sets up the crosswind correction well before touchdown, does not require a heading change at the moment before touchdown, and allows the pilot to exercise smooth and continuous control. Pilots using this technique use precise airplane control as changes in control pressure occur near the ground, on short final, and while over the runway.
To use the wing-low method, the pilot first uses rudder to align and maintain the airplane’s heading with the runway direction. Since the airplane is now exposed to an uncorrected crosswind, the airplane will begin to drift. Note the rate and direction of drift, and oppose it using ailerons resulting in just enough bank to cancel the drift. Figure 9-16 Varying the amount of bank allows the pilot to drift either to the left or to the right, and the pilot adjusts control pressures as needed to intercept and maintain the runway centerline. If the crosswind changes, the sideslip is adjusted to keep the airplane in line with the center of the runway. [Figure 9-17]
To correct for strong crosswind, the slip into the wind is increased by lowering the upwind wing as needed. As a consequence, this results in a greater tendency of the airplane to turn. Since turning is not desired, considerable opposite rudder is applied to keep the airplane’s longitudinal axis aligned with the runway. In some airplanes, there may not be sufficient rudder travel available to compensate for the strong turning tendency caused by the steep bank. If the required bank is such that full opposite rudder does not prevent a turn, the wind is too strong to safely land the airplane on that particular runway with those wind conditions. Since the airplane’s capability is exceeded, it is imperative that the landing be made on a more favorable runway either at that airport or at an alternate airport.
Flaps are used during most approaches since they tend to have a stabilizing effect on the airplane. The degree to which flaps are extended vary with the airplane’s handling characteristics, as well as the wind velocity.
Crosswind Round Out (Flare)
Generally, the round out is made like a normal landing approach, but the application of a crosswind correction is continued as necessary to prevent drifting.
Since the airspeed decreases as the round out progresses, the flight controls gradually become less effective. As a result, the crosswind correction being held becomes inadequate. When using the wing-low method, it is necessary to gradually increase the deflection of the rudder and ailerons to maintain the proper amount of drift correction.
Keep the upwind wing down throughout the round out. If the wings are leveled, the airplane begins drifting and the touchdown occurs while drifting. Remember, the primary objective is to land the airplane without subjecting it to any side loads that result from touching down while drifting.
Crosswind Touchdown
If the crab method of drift correction is used throughout the final approach and round out, the crab needs to be removed the instant before touchdown by applying rudder to align the airplane’s longitudinal axis with its direction of movement.
If the wing-low method is used, the crosswind correction is maintained throughout the round out, and the initial touchdown occurs on the upwind main wheel. During gusty or high wind conditions, prompt adjustments are made in the crosswind correction to assure that the airplane does not drift as the airplane touches down. As the forward momentum decreases after initial contact, the weight of the airplane causes the downwind main wheel to gradually settle onto the runway.
In those airplanes having nose-wheel steering interconnected with the rudder, the nose-wheel is not aligned with the runway as the main wheels touch down because opposite rudder is being held for the crosswind correction. To prevent swerving in the direction the nose-wheel is offset, the corrective rudder pressure needs to be relaxed as the nose-wheel touches down.
CROSSWIND AFTER LANDING ROLL
Particularly during the after-landing roll, special attention should be given to maintaining directional control by the use of rudder or nose-wheel steering, while keeping the upwind wing from rising by the use of aileron. When an airplane is airborne, it moves with the air mass in which it is flying regardless of the airplane’s heading and speed. When an airplane is on the ground, it is unable to move with the air mass (crosswind) because of the resistance created by ground friction on the wheels.
Characteristically, an airplane has a greater profile or side area behind the main landing gear than forward of the gear. With the main wheels acting as a pivot point and the greater surface area exposed to the crosswind behind that pivot point, the airplane tends to turn or weathervane into the wind.
The relative wind acting on an airplane during the after-landing roll is the result of two factors. One is the natural wind, which acts in the direction the air mass is traveling. It has a headwind component acting along the airplane’s ground track and a crosswind component acting 90° to its track. The other factor is the wind induced by the forward movement of the airplane, which acts parallel and opposite to the direction of movement. The relative wind is the resultant of these two factors and acts from a direction somewhere between the two components. The faster the airplane’s groundspeed, the more the relative wind aligns towards the nose of the aircraft. As the airplane’s forward speed decreases during the after-landing roll, the forward component of the relative wind decreases, causing the relative wind to act in a direction more aligned with the crosswind component. The greater the crosswind component, the more difficult it is to prevent weathervaning, especially with a conventional-gear airplane.
Maintaining control on the ground is a critical part of the after-landing roll because of the weathervaning effect of the wind on the airplane. Additionally, tire side load from runway contact while drifting may generate a “roll-over” in a tricycle-geared airplane. This occurs when one main wheel lifts up off the ground and the airplane tips forward along the axis between the nose-wheel and the main wheel still on the ground. A roll-over could cause one wingtip or the prop to contact the ground. The basic factors involved are cornering angle and side load.
Cornering angle is the angular difference between the heading of a tire and its path. Whenever a load-bearing tire’s path and heading diverge, a side load is created. It is accompanied by tire distortion. Although side load differs in varying tires and air pressures, it is completely independent of speed, and through a considerable range, is directly proportional to the cornering angle and the weight supported by the tire. As little as 10° of cornering angle creates a side load equal to half the supported weight; after 20°, the side load does not increase with increasing cornering angle. For each high-wing, tricycle-geared airplane, there is a cornering angle at which roll-over is inevitable. At lesser angles, the roll-over may be avoided by use of ailerons, rudder, or steerable nose-wheel, but not brakes.
While the airplane is decelerating during the after-landing roll, more and more aileron is applied to keep the upwind wing from rising.
Since the airplane is slowing down, there is less airflow around the ailerons and they become
wind becomes more of a crosswind and exerts a greater lifting force on the upwind wing. When the airplane is coming to a stop, the aileron control should be held fully toward the wind.
FAA-H-8083-3C – Approaches and Landings