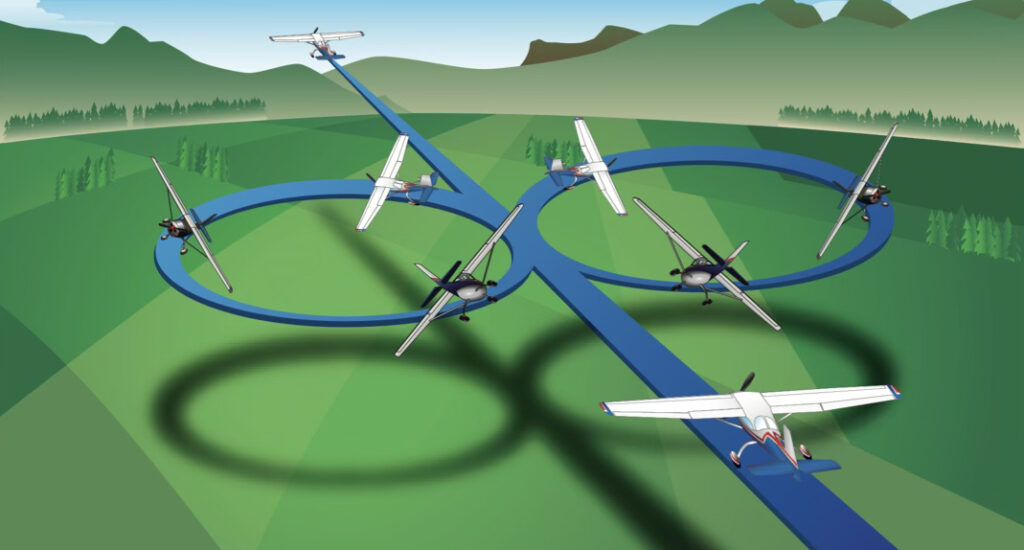
The steep turn is a maximum performance level turn that demonstrates the increase in load factor of steeply banked level turns, the necessity of increasing back elevator pressure to compensate for the loss of vertical lift, overbanking tendencies, and requires pilots to have an understanding of maneuvering speed and accelerated stalls.
A steep turn is a maneuver in which an aircraft is banked at a relatively high bank angle — typically 45 to 60 degrees of bank — while turning in a coordinated fashion to maintain altitude and airspeed.
The objective of the steep turn is to develop a pilot’s skill in flight control smoothness and coordination, an awareness of the airplane’s orientation to outside references, division of attention between flight control application, and the constant need to scan for hazards.
Performing the maneuver for testing purposes differs between Private Pilot, Commercial Pilot and Flight Instructor mainly the bank angle increases for Commercial Pilot and Flight Instructor and the requirements for “Perform the Task in the opposite direction” changes from Private Pilot to Commercial Pilot and Flight Instructor ACS requirements. (see below)
Private Pilot ACS Skills
- Clear the area.
- Establish the manufacturer’s recommended airspeed; or if one is not available, an airspeed not to exceed the maneuvering speed (VA).
- Roll into a coordinated 360° steep turn with approximately a 45° bank.
- Perform the Task in the opposite direction, as specified by evaluator.
- Maintain the entry altitude ±100 feet, airspeed ±10 knots, bank ±5°, and roll out on the entry heading ±10°.
Commercial Pilot ACS Skills
- Clear the area.
- Establish the manufacturer’s recommended airspeed; or if one is not available, an airspeed not to exceed maneuvering speed (VA).
- Roll into a coordinated 360° steep turn with approximately a 50° bank.
- Perform the Task in the opposite direction.
- Maintain the entry altitude ±100 feet, airspeed ±10 knots, bank ±5°, and roll out on the entry heading ±10°.
Flight Instructor ACS Skills
- Clear the area.
- Establish the manufacturer’s recommended airspeed; or if one is not available, an airspeed not to exceed maneuvering speed (VA).
- Roll into a coordinated 360° steep turn with approximately a 50° bank.
- Perform the Task in the opposite direction.
- Maintain the entry altitude ±100 feet, airspeed ±10 knots, bank ±5°, and roll out on the entry heading ±10°.
- Analyze and correct common errors related to this task.
- When performing steep turns, pilots will be exposed to:
- Higher load factors
- The airplane’s inherent over-banking tendency
- The loss of vertical component of lift when the wings are steeply banked
- The need for substantial pitch control pressures
- The need for additional power to maintain altitude and airspeed during the turn
Bank Angle and Load Factor – As an airplane turns, its weight remains the same, and therefore the upward component of lift must remain equal to its weight. During a turn, some of the lift must be directed towards the center of the turn, reducing the upward component of lift. If no pilot corrections were applied, the airplane would not produce any more than the normal 1g of lift, and the airplane would begin to descend. In order to correct for the loss of vertical lift, and maintain a level altitude, the wing must produce more lift, which requires increased back elevator pressure. This increased back elevator pressure will cause the wing to fly at a higher angle of attack, producing the increased lift that is required. This can be felt by the pilot as a higher than normal G-force.
Steep turns are simply normal, level turns that are made at a bank angle where the amount of total lift required is significantly higher than 1g. In order to maintain 1g of vertical lift, while also turning, the wing must produce more than 1g of total lift. The amount of total lift is called the load factor.
- As the bank angle increases, the load factor required to maintain level flight increases slowly at first, but increases rapidly, especially at bank angles beyond 45 degrees. The load factor created by a level turn depends only on the bank angle. Note that airspeed does not affect the load factor of a turn.
Flying the Maneuver.
- Before starting any practice maneuver, the pilot must ensure that the area is clear of air traffic and other hazards. (CHAMPS Checklist) and make a position report on ECAC traffic frequency (123.5)
- Clearing Turns (2 x 90° turns)
- Heading, (use a prominent land mark or a compass heading if landmarks are hard to see )
- Altitude, (no lower than 1,500′ AGL)
- Mixture Rich
- Place to Land / Fuel Pump On,
- Seat Belts and Switches.
- Power 22-2300 RPM and 95 knots
- Find a large / prominent visual reference point on the horizon (or use a compass heading)
- After clearing left / right, Initiate a 45° bank to the left or right (50° bank Commercial & Flight Instructor)
- Upon banking through 30° add 1-200 RPM and begin applying enough back pressure to keep the airplane level.
- Use trim (roll back x 2) to relieve control pressures as required.
- Divide attention inside and outside of the cockpit throughout the turn.
- Roll Out (on same heading as entry heading)
- (Private Pilot) Roll out onto your chosen point (after turning 360°) and apply forward pressure as necessary, reduce the power (between 1-200 RPM) as you roll out so the airplane does not balloon.
- Perform the Task in the opposite direction, as specified by evaluator.
- (Commercial Pilot / Flight Instructor) Roll out onto your chosen point (after turning 360°) and apply forward pressure as necessary to prevent the airplane from gaining altitude, then “Perform the Task in the opposite direction”. roll into a steep banked turn to the opposite direction. After the second 360° turn, roll out onto the chosen point or heading. Reduce the power (between 1-200 RPM) as you roll out so the airplane does not balloon. Trim forward x 2 (as required for level flight)
- (Private Pilot) Roll out onto your chosen point (after turning 360°) and apply forward pressure as necessary, reduce the power (between 1-200 RPM) as you roll out so the airplane does not balloon.
- Exit the maneuver on the same altitude and heading as you entered.
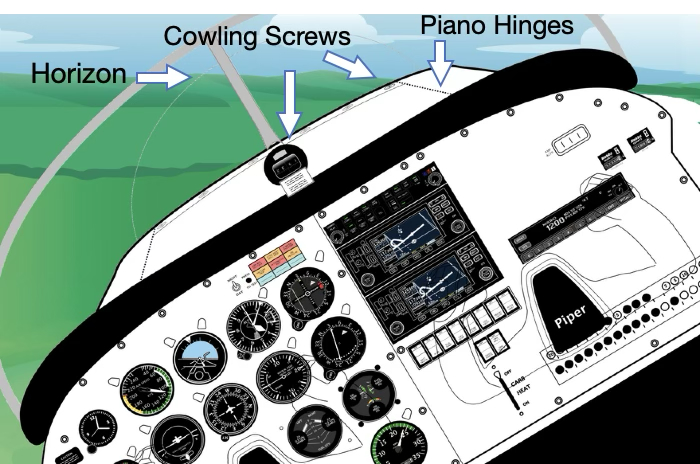
Using outside references.
- It is important to note that the relationship (sight picture) will be different depending on whether you are in a right steep turn or in a left steep turn.
- When turning to the right the reference point to nose will appear differently as opposed to the turning left. In the left seat the left turn the nose will appear lower, turning right the nose will appear higher.
- Maintaining bank angle, altitude, and orientation requires an awareness of the relative position of the horizon to the nose and the wings. The pilot who references the aircraft’s attitude by observing only the nose will have difficulty maintaining altitude. A pilot who observes both the nose and the wings relative to the horizon is likely able to maintain altitude within performance standards.
- By noting and using a reference point on the nose / cowling of the airplane (such as screws, piano hinges etc, – below) you should create a reference between that point and the horizon. By observing that point on the horizon and watching it move along the horizon in the turn, it will serve as a guide to whether you are climbing, descending or remaining level without having to stare at your flight instruments. The reference may vary on different aircraft and between left and right turns.
- After the selected bank angle has been reached, the pilot will find that considerable force is required on the elevator control to maintain altitude.
- Use of elevator trim and power as the maneuver is entered so the steep turns can be conducted more easily by relieving the control pressures.
- Keep in mind that as the AOA increases, so does drag. Consequently, power must be added to maintain altitude and airspeed.
In many light general aviation airplanes, as the bank angle transitions from medium to steep, increasing elevator up trim and adding a small increase in engine power minimizes control pressure requirements.
The rollout from the steep turn should be timed so that the wings reach level flight when the airplane is on heading from which the maneuver was started.
A good rule of thumb is to begin the rollout at ½ the number of degrees of bank prior to reaching the terminating heading.
While the rollout is being made, elevator back pressure, trim, and power should be gradually reduced, as necessary, to maintain the altitude and airspeed.
Airman Certification Standards (ACS)
References: FAA-H-8083-2, FAA-H-8083-3, FAA-H-8083-25; POH/AFM
Objective: To determine the applicant exhibits satisfactory knowledge, risk management, and skills associated with steep turns.
Knowledge: The applicant demonstrates understanding of:
PA.V.A.K1 How to conduct a proper steep turn.
PA.V.A.K2 Aerodynamics associated with steep turns, including:
PA.V.A.K2a Maintaining coordinated flight
PA.V.A.K2b Over banking tendencies
PA.V.A.K2c Maneuvering speed, including the impact of weight changes
PA.V.A.K2d Load factor and accelerated stalls
PA.V.A.K2e Rate and radius of turn
Risk Management: The applicant is able to identify, assess, and mitigate risk associated with:
PA.V.A.R1 Division of attention between aircraft control and orientation.
PA.V.A.R2 Collision hazards.
PA.V.A.R3 Low altitude maneuvering, including stall, spin, or controlled flight into terrain (CFIT).
PA.V.A.R4 Distractions, task prioritization, loss of situational awareness, or disorientation.
PA.V.A.R5 Uncoordinated flight.
Skills: The applicant exhibits the skill to:
PA.V.A.S1 Clear the area.
PA.V.A.S2 Establish the manufacturer’s recommended airspeed; or if one is not available, an airspeed not to exceed the maneuvering speed (VA).
PA.V.A.S3 Roll into a coordinated 360° steep turn with approximately a 45° bank.
PA.V.A.S4 Perform the Task in the opposite direction, as specified by evaluator.
PA.V.A.S5 Maintain:
- the entry altitude ±100 feet,
- airspeed ±10 knots,
- bank ±5°,
- and roll out on the entry heading ±10°.